Tuesday, December 13, 2011

76. Downstairs


It's been a couple of months now, but I wanted to share this picture from September 11th.  I remembered to bring a flag with us that weekend, but forgot to pick up a flagpole and bracket.  While I was making coffee, Dave snuck out and rigged up a piece of wire so we could hang it up anyway.  It was a beautiful morning, and we were grateful.

The kitchen has really been coming along, and it is so nice to finally have some color in the house.  It began with this "alcove" just to one side of the back door in the kitchen that has always been a little awkward.  It's kind of shallow, and we've been leaning brooms and mops and kicking off shoes there since the beginning.  My idea was to put some kind of broom closet there, where we could hide the vacuum and maybe even our little barbecue grill as well.

It was Dave, of course, who came up with the idea to put a pair of doors there, so the thing could open up completely.  I love it because it looks almost like a paneled wall!  Right there I've captured the moment when he puts a level up to his work and usually just shakes his head, because it's perfect of course.  We put up shelves already, and plan to put up some pegboard to hang stuff on. I'll wait to show you the inside once it's finished and painted.

Right behind where Dave is standing is a pair of windows that we decided to save.  As I've said before some of the windows in the house are just getting sealed up but these are a couple of the lucky ones.  I put a new sill in a while ago, because the old one was almost non-existant.  We had to remove one piece of trim to get at the sash weight - it needed it's rope replaced.  The others were still fine, and all the pulleys worked ok.  The lower windows came out and got stripped and repainted, along with the whole frame.

Here Roscoe is giving Dave a hand with a little carpentry work on the back porch.  When you need a sawhorse, apparently a boxer will do just fine!  He stood there through 5 or 6 cuts, watching the kitty in the neighbor's yard I imagine.
Here's that end of the kitchen, as it stands right now.  The windows have been put back together, and they open and close just like they are supposed to.  Note the closet doors have some pretty cool handles on there now.  The icky wall and door jamb have finally been primed... yes you guessed it, the next step is paint, and I have picked a color though I won't reveal it just yet.  Also please check out the little vintage Cosco step-stool I picked up at goodwill!

It took me a long time to decide what color I was going to paint the cabinets, but when it was finally time to do the work, this is what I chose.  Each week I would take a couple of cabinet doors home to work on in the studio.  The door on the right has been primed and painted with a flat "Beach Grass".  On the left you can see I've applied a water-based stain they sell for $8 a tube at Home Depot.  Once I got it home I realized it was just acrylic paint, so don't make that mistake!  It gets rubbed on and wiped off to add an aged feel.  When that was dry I went over it with a good urethane varnish.

Along with that I began installing the tile back splash and bar top. Here's the first rows.  The tiles are lovely to me - irregular and chunky and hand made, but I can see why an installer would DREAD this job.  No two are exactly alike in size or thickness, and none of them are square.  It really felt more like an art project than a tile job, but hey, I like that sort of thing.  Dave is surprisingly supportive since he likes things that line up nice and neatly. I worked hard to make sure it wasn't too wacky when it was done

The tile is installed here, and you can see the 'before' color of the cabinets, which was just a bit too ordinary for my kooky taste.


And now for the color I promised.  The cabinets are all painted and the tile is done.  Ain't it purty?  You can also see the nice wooden edge that Dave made for the bar top which I painted as well to match the cabinets.

Here's the view from the kitchen sink, looking out across the dining room. The sun streams in at morning time, it's really wonderful.  We are planning to get a lot of painting done over the holidays - so be prepared to see the kitchen and guest room 100% done very soon!

Wednesday, November 16, 2011

75. Upstairs

I don't want to hear about it... I know it's been almost three months.  Let's see... since August, we've been to New York and Connecticut and back.  Dave has changed jobs three times (through no fault of his own - his company got bought out and bought out again).  I have joined Etsy and am now the proud owner of an online shop called Heartkeyologie.  Needless to say it's been a little nuts around here but dare I say things are settling down?  Probably not!

Of course we still run to Daytona as many weekends as we can, and it's actually relaxing getting over there and working on projects.  I know I love it, but I still have a certain amazement that I have found a partner that loves it just as much.

This episode is going to be about some stuff we've gotten done upstairs, and post number 76 will be about the downstairs.  We are really getting into the cosmetics now, and there's lots to tell about.  This is the little hall closet upstairs.  The original door had been cut along the bottom by the previous owners to fit the "new" slope of the floor.  I like closets, especially linen closets and pantries, not to have doors - they stay neater that way.  So that door is at home now, waiting be repurposed into something else, maybe a headboard or display cabinet.

When the center of the house sank years ago, a lot of the plaster was damaged, as is evidenced by the condition of the back wall of this closet.  Since the other side of that wall is open to the crawl space and the top of the closet is just under the roof, we decided to fir the wall out and add 3/4" insulation board.  It made a noticeable difference in heat gain as soon as we installed this.

Here the bead board paneling is up, and you can see the Dr Seuss quality of the shape:  that is not an optical illusion.  The shelves were original and Dave did a great job reinstalling them at dead level, and that's all that counts, right?  I thought I had a picture of the closet after it was painted and the shelves were refinished... but I can't find it so you'll just have to wait for that one.

 We decided it was finally time to do just a little work on the master bedroom.  I wanted to get a guest room ready, so that was first priority, but since we are trying to wrap up any woodwork before the painting starts, this had to be done next.  The windows on the north wall had obviously had some leakage - no surprise considering there were 1/2" gaps in places before we sealed them up.  The paneling someone put up over the stucco in the 70s was beginning to delaminate and buckle.   Frankly I was afraid the whole wall would have to be rebuilt and dreaded this undertaking.  We were pleasantly surprised that the paneling came off and the wall underneath was pretty solid - barely even cracks in the stucco.

As we worked our way around the room, we left the paneling that was still good - it will be fine once painted over.  We cut it at about 36" and installed wainscot below to replace it.

While Dave was working away on that I had the heat gun out and stripped the window sills to prep for paint.

Here the window frames have been all painted nicely and I've placed two color swatches to try to imagine these color on the walls.  Please ignore the horrible brassy ball door knob, that's gonna go!

In closing, I'd like to introduce you to Crabby, a shy visitor that dropped by one night.  She scuttled across the path as I was picking up some things outside after dark, and scared the crap out of me actually (she's about 6" wide).  I thought "poor thing, how will she ever find her way back to the beach without getting run over by a car?"  So I captured her in a bucket and we planned a walk to the beach.  Fortunately, Dave had the brilliant idea to look her up on the internet for identification and we found out she is a blue land crab and is not interested in the water except at mating time.  They dig little holes and live in the yard!  I haven't seen her since, but she taught us something new about our lovely Florida native wildlife.


Monday, August 29, 2011

74. Guest Room is Looking Great!

Well another month has flown by!  My niece got married a few weeks ago, and that took us to Detroit for one weekend, but we did have a couple of others to get a few things done on the house.  With only two days at Grandview at a time, we are still making great progress.

This used to be a double bench seat next to the fireplace, with a  storage area inside.  The right half was eaten up with AC ductwork from the basement to the second floor and the left side had been used for firewood I guess - it was pretty rough inside.

(I did like the little brass handle used on the bench seat though, and I salvaged the one from the right side to use somewhere else.)


Here you can see the inside of the bench, all trimmed nicely with some leftover bead board paneling.  I decided against the firewood idea, considering we had a termite "episode" recently, requiring me to get the house tented and fumigated at the cost of around $1200.  So when winter comes we will buy just what firewood we need, and use the space more efficiently for:  TOOLS!


That brings me to the next item,  lovingly referred to as the "tomboy's pantry" which up until now has been filled with every tool in the book, as well as caulk, paint, and scraps of trim etc.  Not any more!  It's finally received it's own caulk and paint, and the shelves are on site and ready to paint.  I have a novel idea for this pantry - I think I'll store food and kitchen stuff in it!  I already have the tiles to do the floor... one day soon.


I've been heavily occupied in the garden lately, since August is probably the month when you see the most growth out there - desirable and otherwise.  

This gives Dave a chance to finish up all kinds of little trim projects inside the house, which are his favorite.  This where the side of the tiled fireplace meets the chase I built to cover the duct work.  I had no idea what do do here, and actually considered just caulking the crack and letting it go.  After about a thousand mitered cuts, Dave had it nicely finished out with cove molding... sweet, huh?


Another project left unfinished by me... the base around the bar.  He wrapped that up nicely as well.  Sometimes I think this house is going to be so beautiful and classy when it's done, I won't even fit in here!


Now we are up in the guest room, preparing to replace two more windows.  There were 30 year old aluminum windows in here, that were cracked and fell apart when you tried to open them.  I guess those replaced the original cute crank out ones like those in the laundry room long, long ago.  Here we have removed the wood someone put in over where the old hinges were.  Makes me sad that I can't have those up front but the originals are long gone.


After lots of caulking and adding some new wood, and more caulking, here are the new windows installed.  Yes, the center post looks crooked - it will get a little rebuild so that won't be so obvious.   It was amazing as soon as we got them in how tight the room felt - you just get used to hearing everything that's going on outside, and now it's peaceful and quiet.  I am looking forward to doing the same in the master bedroom eventually.  Only 13 windows to go!!


The guest room... all that's needed in here is to paint the trim and it will be the first completely finished room in the house.  We rearranged things to make a sitting area by the windows - it's really quite comfortable, and I hope you get to see it in person some day!


When you do, you will have to take an evening walk to the beach.  We enjoy those - heading down around sunset or after, when things cool down.  Out along the water's edge, we listen to the ocean, as we pass the Ocean Deck and all the hotels filled with people who actually have to leave in the morning!  Then it's on to the boardwalk for a little salt water taffy.  We haven't yet tried the Ferris wheel or go-kart track but I know one day we will.

Wednesday, July 27, 2011

73. We Do Do Windows!

I thought I'd pick up where I left off - the front step.  I brought these salvaged bricks from home, where I have them all over the place.  This area was one that was prone to washouts, and worse - heavy dog traffic.  It's a narrow spot where Roscoe zooms through during  his 'crazy bouts', and dirt would go flying everywhere.   I knew there was no way to get the grass to grow with that going on.   I've adjusted the grading so when the water splashes off the roof (no gutters) the stones take the brunt and the water flows to the left and out into the yard rather than down the front walkway.  A lot of brutal work in 90 degree weather, but well worth it!


From that view if you look to your left down the fence line this is what you see.  It's not completely finished yet, but lots of stuff has been planted and everything I've put in seems to like it here.  There's been lots of rain and the grass is filling in nicely, things are blooming - tra la!!


Might as well wrap up this part of the report with a picture of the back yard, in which the grass is also growing nicely - it's hard to imagine it was a sandbox only a few months ago.  Kathleen, that vine is the pink trumpet vine you gave me... it's going nuts but no blooms yet at all, I'm hoping for a big surprise next spring.  If you look closely you can see the baby-bed spring that is mounted on the fence as a trellis.  Dave and I picked this out of someone's trash on one of our walks.  Lucky for me he's such a cooperative soul.


When I first bought the house I got a quote on replacing all 26 windows in the house.  It was something in the neighborhood of $17,000 so that idea was quickly discarded.  Early on I finished the one over the kitchen sink (Episode 52 in September) and the one on the porch (Episode 60 in November), which was no easy task.  The rest of them have been covered with visqueen since it got cold last winter because I knew it would be a long long time before I got around to working on them again.  They rattled and when the wind blew the visqueen would "breathe" hot or cold air depending on the season.  Then not long ago, after a very heavy rain and wind event we came to the house to find a puddle on the dining room floor.  At other times we saw puddles in the living room and foyer as well.  Ok, ok.  Time to work on the remaining 24 windows.  


As I mentioned before, we came to the conclusion that the windows on the sides of the house would rarely need to be opened, since the cross breeze from the beach (mmmm it is as sweet as it sounds) goes from front to back.  This simplified the issue, and we decided to make all the side windows fixed in place, caulked up and no more leaky drafty-ness.  Ever.  We began with the two in the dining room, which you already saw.  Then this one, and the one opposite, in the living room.  Only 20 to go!


Our next victim was this cutie on the side of the sunroom.  Now let me say here, I hate to have to close up a groovy old window.  But if you could see how - um - messed up - they are you might understand.  Originally the two panels on either side were fixed, and the center ones slid out to open up.  Fine if you don't have central AC but very hard to get them to slide, never mind seal up against the elements.  Plus there were muttons (cross-bars) broken, and damage where apparently a doggie (not mine) was trapped inside and tried to eat his way out.


I helped a little but Dave and his expertise are really the ones getting this window project finished in fine style.  It starts with taking everything apart and putting back new pieces with the old - here he has fashioned a replacement for a mutton that was half-chewed off.  Another job for his elite coping skills!  One pane of glass got replaced, and I added window glazing caulk on the outside after scraping off any loose old stuff.


Here's what it looked like with a little added trim for pizzazz...  19 to go!


These three are on the second floor - that's the view back over our cute little neighborhood.  In the other direction you can see the ocean between the buildings on A1A.  Over the course of one whole day these windows got disassembled, scraped, put back in place atop a bed of caulk, and expertly trimmed.  You can see the new wood along the edges.  The original charm of the windows is retained, but no more hot breath as you walk by.  The two in the front of the picture are in the guest room and the furthest one is actually in the hallway.


And now for the piece de resistance... the first of the cute cranky windows along the back of the second story.  There are two of these in the laundry room and two in the upstairs bath.  They were in such bad shape because this wall is the one that endured most of the damage as the house sagged way back when.  Take a look at a "before" shot in Episode 51 when I was working on the laundry room if you want to see how kitty wampus they were.  HOWEVER... I was determined to save these because I think they have such appeal and the glass is all original.  I thought I would have to take them out and rebuild the jambs, but Dave knew just how to fix them.  I even kept the original hinges and casement cranks - a little TLC and WD40 and they are as good as new.  The whole thing is weather stripped and tight as a drum now and I love it.  This one window took the better part of a weekend because of the complexity and there are three more just like it! 


There are 15 windows left to deal with which seems like almost nothing at the rate we are going.  Another area that was providing a lot of air leakage was the front door.  Since it's going to be replaced we didn't want to go crazy fixing it but it got a full weather-strip job this weekend.  I am going to start this week refinishing the door that will go in it's place... remember the one that went into the shop many moons ago?  The day that gets installed will be an exciting one and it's not far off.


I found these beautiful little tiles on a recent trip to the Habitat for Humanity ReStore.  There were boxes and boxes in all colors and I was oh-so-tempted just to buy them all!  The boxes say "Made in Morocco" and the glazes are all imperfect and beautiful.  I picked four colors to use in a random pattern on the bar top and the kitchen back splash.  The colored glass tiles I was going to use would have cost twice as much and not been nearly as unique and cool as these are.  And since glass tiles probably wouldn't be a smart thing to put on a bar top I was almost ready to settle for something beige!  So there's another fun project to entertain you in the not-too-distant future.


When we got back from a recent walk to the beach I spotted Roscoe, eagerly awaiting our return.  Fortunately neither one of my dogs has a taste for wooden window sills - they'd rather take naps until there is something more interesting to do.  However he does have a bad habit of jumping up to peek out the glass in the front door, which is really going to be a problem once the new door is in.  Hopefully I can lovingly modify that behavior - or worst case put a chair in front of the door so he can climb up and look out safely.  If only the big goofball wasn't so doggone cute I would spank him!

72. Dragonflies, Front Steps and a Kitty Cat

Well hello stranger!  If you think we've been slacking off and not getting anything done at Grandview, think again.  I know it's been since mid-June since I posted last, but I have lots to share, so buckle up!

My 49th birthday arrived on June 23rd, and Dave surprised me with this beautiful light for the house.   We had been tossing ideas around for just the right pendant fixture for the second floor stairwell, and this is the one we liked best.  I was thrilled because Dave's taste at times runs along some very modern and "hi-tech" looks... I was prepared to compromise some, but when he said he liked this one because of the colors, I knew we had a winner.  Dragonflies are one of our most favorite insects because they are a predator of our least favorite insect:  Mosquitos!!  Plus it has all those beachy greens and blues that I'm using throughout the house.  Next to go is that wall fixture you can barely see in the background there... as soon as I find just the right one to replace it.

Wow, does this look like a mess or what?  Not so!  This is exactly the kind of project that Dave and I thrive on.  If something isn't right, we begin by taking it apart piece by piece, until we get down to something solid.  The next step may not be clear right away, but we stand back and take a good look, discussing different ideas, and soon we are putting pieces back into place.  Here we are dealing with the entryway to the porch, which will be a focal point, obviously, of the whole project.  There had been so many patchy-poo jobs done on it previously it all had to go.  The siding, trim, and even a lot of the tiles had to be removed before we could start again, with a clean slate.

I had the illustrious job of crawling under the house to get an idea of what was going on down there, as the porch floor was seriously sagging at that front corner.  On the left you can see the back of the concrete steps (covered with tile on the outside) - what a mess those were!  Solid but pieced together in chunks, kind of a funny way to build steps in my opinion.  You can also see the pipe that connects to the hose bib.  Once I got under there, it became apparent that we weren't going to jack everything up like it should have been, but we decided to shore it all up so there would be no further sag and proceed with the cosmetics after that.  We put in a bottom plate and added several vertical supports, so the work we were about to do on the porch wouldn't be a waste of time.  I spent a few grueling hours hunched over under there, but I was grateful for how cool it was - In this heat it's amazing how the basement and crawl space remain so comfortable.

Here we've made a little progress.  All the underneath work is done.  At the lower left you can see where the hose bib is, and below that a pipe that is connected to a drain I put at the lowest point of the porch floor.  When it rains water would collect there in the corner, but now it has a place to go.  I can also hose the porch off to clean it if necessary.   Also note the tiles have been removed from the side of the stair.  Because of the "inconsistencies" of the concrete underneath, and since the guy who put the tile down used an ice cream scoop to put the adhesive on them, there were huge gaps between the tile and concrete.  Whenever you have gaps like this the tiles can break very easily, which was happening along this side as well as that top step where we pried everything off.  Trust me it will be solid as a rock when I'm through with it!

This view of the side shows the bottom row of tiles in place with adhesive, and mortar poured in behind to fill in all the gaps.  I used caulking backer rod (a 5/8" snake of styrofoam for filling large gaps before caulking) in between the tiles to keep the mortar from oozing out where the grout will eventually go.  I let that harden up for a day before adding the next row, followed by the ones on top.  And check out that beautiful little drain pipe - Dave cut the circle with something called a "coping" saw which he uses like a surgeon does his scalpel, for all those little detailed wood projects.  I'll show you more about that in a future post.  I haven't tried it yet, but I would like to learn to cope as well as he does... yes the irony of this is not lost on me.  I'm also quite proud of our little stone area where the hose is - no more trampling through dirt/mud to get to the hose bib.

No, Dave is not building a piano.  After we removed the tiles (that were so poorly installed they were an eyesore and a safety hazard) the subfloor had to be rebuilt.  It was important to create exactly the right slope, so Dave created custom shims - each one just a tiny bit thicker than the one next to it.  Here he is preparing to put the piece of floor decking on top.  I will top that with concrete backer board to create a perfect base for a quality tile job.  You can also see the lovely supports that he installed with the help of someone who crawled into that little space underneath.  Well actually I went in through the basement door but I was UNDER THERE!  Thought maybe I'd find that hidden box of treasure I've been looking for, but unless you count a couple of aluminum cans, no luck there.

All the tiles are in, but not grouted yet.  Nice and sturdy, stable and level.  That black mat in front is a piece of tar paper someone glued down, and I've begun peeling it up, but it's one of those things I've walked over so many times I don't notice it until I see how ugly it is in a photograph.  That beautiful cypress lap siding is the same wood that brought me to my David...the same stuff we installed together on that window wall there almost exactly one year ago!  Can you believe we are almost ready to paint it!  What a process, and what fun it has been along the way.

To wrap up this episode I bring you Dee Dee, Queen of Grandview.  Doesn't she look regal there perched on the front ledge?  We take her out for a walk on that little leash, and all she wants to do is pose right there.  I thought it would be fun if my readers would caption this photo, so please leave a comment this time - I think there's a link to click at the bottom and tell me what you think she is thinking about, and I'll add the best one to the photo.

I have lots more photos so there will be another post very soon!

Thursday, June 16, 2011

71. Rapid Fire

I have pictures I've been meaning to upload for three weeks now, but I have been procrastinating.  I'll use the excuse that springtime in Central Florida comes upon you in such a rush and tumble that it's all you can do to keep from getting mowed over (I meant that pun).  The grass begins to shoot out of everywhere, and the "flower beds" become overwhelmed by every sprouting seed that has blown in there during the last many months.  Of course I go over them with great care, because some of the volunteers, as I like to call them, are allowed to stay.  What someone else might deem a weed I will cultivate, just because the butterflies like it.

Let's just say that's been keeping me pretty busy during my time away from Grandview, but we have been faithfully putting in our weekends there and here's the proof, in Rapid Fire format:

This is the back door, which opens onto the little porch off the kitchen.  Thanks to a friend at a local trim and door company I got a great deal on this beautiful insert - it's one of those double windows with a pleated shade in between.  Nice for privacy, yet easy to peek out and see what the neighbors are up to!

Remember we were working on the front fence... well here's the completed view after it was completely painted.  It's hard to imagine what a difference this makes to the look of the whole place:  you almost don't notice that the entire house needs to be painted.  So many neighbors have commented on how nice it looks... kinda makes ya proud.

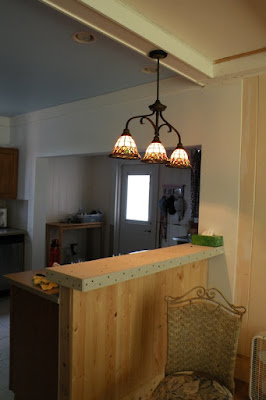
On the inside, we finally got around to the light fixture over the bar - the one I bought at a thrift store probably 6 months ago!  Well, when I got into the box there was a piece missing so after a trip to good old Home Depot we came home with a new cowling, which didn't have the right size hole in it.  Here is Dave solving that problem with a make-shift drill press, which I thought was a great idea!

Here is the light, installed, hanging from that beautiful beam which had been primed and painted in advance.  Now the hard part:  to figure out what kind of tile to put on the bar!

A little job in the kitchen, but one I happily handed off to the staff carpenter, while I was playing around outside in the garden.  He trimmed out the inside of the funny pantry door - we are going to refinish and use the original door that was taken out of there, and Dave has an ingenious idea about how to hang it.  You'll see!

Another lovely trim job finished on the porch - each of the posts got a little box built around the bottom, to give them a nice finished look.  A little more scraping and a bit of woodwork and we are very close to finishing off the porch with primer and paint.

From the beginning of this project I have envisioned this small front yard as a cottage garden - very little grass, a path and mounds of flowering perennials everywhere.  I waited until the beginning of what is supposed to be the rainy season to begin planting, but the new flowers are set up with soaker hoses on a timer, at least until they become established.  I worked on the two corner areas, and the pink rectangle shows what will come next.  Like my garden at home it will evolve over time, as I see what thrives in this location.  I brought a lot of plants from home - and a few new ones, to kick it off.

This project was a very important one, since after the last super-windy rain storm there was a big puddle of water in front of this dining room window.  The best thing to do would be to put new windows in here, but since that's not in the budget we decided to make all the big windows on the sides of the house into fixed-glass.  In other words they won't slide up and down any more, but they won't leak air or water, either - it's a sacrifice I thought was worth it.

Here's the same window from the outside - may not look any different to you but I guarantee it won't leak!  Two down, ten to go!

And lastly, Roscoe playing hide-and-seek behind our very cool cedar tree in the front yard.  Does he really think I don't see him?